Getting Started#
Requesting Access#
To sign into the HPC you will need to be granted access.
Please go to Service Desk: http://servicedesk.lshtm.ac.uk
Then fill out the Request LSHTM HPC access form.
We will email you once access has been granted.
You will also be added to the HPC Mailing List: https://lists.lshtm.ac.uk/sympa/info/hpc
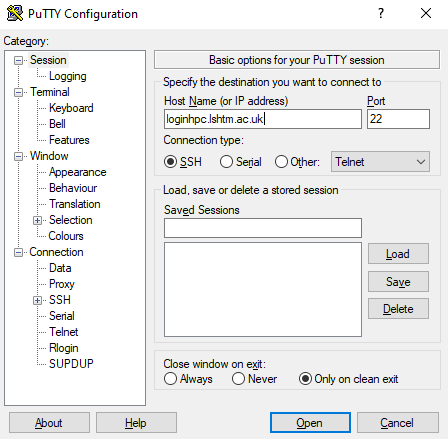
Signing In#
To access the cluster, connect to loginhpc.lshtm.ac.uk using ssh.
As the HPC is behind our firewall, you will need to be connected to the schools network, or in remote desktop to connect to it.
Alternatively you can use our SSH gateway pryor, which will be covered in it’s own section.
Once connected you can sign into the HPC using your LSHTM username and password.
If you’re using Windows, PuTTY is a good SSH client: https://www.chiark.greenend.org.uk/~sgtatham/putty/
If using Mac or Linux, I’d suggesting using the ssh command in the terminal:
ssh <username>@loginhpc.lshtm.ac.uk
Good Practice#
The HPC is a resource shared between it’s users, so it’s important to be considerate.
Here are some basic guidelines for usage:
Do not run jobs on the login node, instead submit them to the scheduler. Testing is OK, but heavy computation will adversely affect other users.
When submitting jobs, try to minimise the number of nodes you use. If possible, use all the resources on one node before adding another.
Don’t store data long term on the HPC. We have a limited amount of storage, so only data you’re activly using should be kept.
The HPC is not currently configured to host sensitive data, so please anonymise any data you use.
Please delete any data saved to the temp directory once your job is finished. It will eventually be deleted, but can cause problems if the file system is full.
Don’t run large numbers of very short jobs (less than a minute). You could try bundling a number of jobs together so they last a few minutes instead.
Linux Skills#
The HPC is used through a text interface which can be quite intimidating at first use.
If you’ve not used Linux before, you might want to take a look at this tutorial: https://ryanstutorials.net/linuxtutorial/
I’ll cover some basics here, but the website goes more in-depth.
The Command Line
When you first sign in you will be presented with the command prompt, and interface where you can submit commands via text, and the results will be display in text.
It will looks something like this:
[your_username@loginhpc ~]$
The prompt is made of 3 sections, your username, the server you’re connected to, and the current working directory. The line is then terminated with the $ symbol. This is where the text you type starts.
The working directory is where your commands will run. When you first sign in the will show ~. This symbol represents your home directory, where your own files/folders are stored.
Basic Commands
Here are the basic commands you’ll need to use and navigate linux.
Most commands will have optional directives you can follow the command with that modify it’s behavior.
Linux Command |
Explanation |
|---|---|
ls |
The ls command lists files and folders in your current directory |
ls -l |
Long format, display files and folders in your current directory showing more information for each object |
ls -a |
Some files and folders in linux can be set to hidden. Most often used for sensitive files you would not want to edit by accident. This command will do the same as ls but includes hidden files/folders. |
ls -la |
Directives can be chained, this will list all file/folders in a long format including hidden objects. |
cd [new_directory] |
Change working directory to the location specified after cd. |
cd .. |
Moves one level up in the files structure. If your current working directory is /home/myuser/test. cd .. would change the directory to /home/myuser |
nano [file_name] |
Nano is a simple text editor. It can also be used to create a new text file. |
pwd |
This command outputs the path of your current working directory. If you’ve lost where you are, this can help. |
cp source destination |
The copy command will copy a file from one location to another. cp file.txt /home/myuser/file.txt |
cp -r source destination |
The -r directive will allow you to copy a folder and it’s subfolders to another location. |
rm [file_name] |
rm will delete a file |
rm -r [folder_name] |
rm -r will delete a folder and it’s contents. |
mv source destination |
This command will move files and directories from one location to another |
mkdir [folder_name] |
mkdir create a new folder, follow the command with the new folders name |
mkdir -p [folder/subfolder] |
The -p directive will create the folder you request as well as the parent folders if they do not exist |
man [command] |
man will show the manual page for a command, telling you what it does and giving some examples |
exit |
Ends your current session and in most cases closes the terminal you are using. |
history |
history prints a list of the last 1000 commands you have entered. |
Take a look at the Linux Commands page for more information.
File Access#
If you need to move files onto the HPC, the easiest way is to use the SCP or sFTP protocols.
On Windows i’d suggest using WinSCP. It’s a capable SCP/FTP client with a File Explorer type interface.
It can be downloaded from here: https://winscp.net/eng/index.php
Mac users can also use the Cyberduck client, which also provides support for sFTP: https://cyberduck.io/
On Mac and Linux you have access to the SCP command in the terminal:
scp file_name your_username@loginhpc:/directoryName/
Submitting Jobs#
To submit a job to the HPC, you would use the sbatch command. This submits your script to the scheduler, which will run it on one of the compute nodes.
Here is an example of a very simple job script running an R script:
#!/bin/bash
#SBATCH --job-name=test    # Job name
#SBATCH --mail-type=END,FAIL          # Mail events (NONE, BEGIN, END, FAIL, ALL)
#SBATCH --mail-user=email@lshtm.ac.uk # Where to send mail
#SBATCH --ntasks=1                    # Run on a single core
#SBATCH --mem=1gb                     # Job memory request
#SBATCH --time=00:05:00               # Time limit hrs:min:sec
pwd; hostname; date

echo "time started"

date

R CMD BATCH Rcode.R

echo "time ended"

date
We’ll cover submitting jobs in more detail on the next page.